趣味の世界、Raspberry Pi (ラズベリパイ)とandroidアプリをbluetooth通信させたのでそのメモを残しておこう。
Bluetooth 経由で、Raspberry Pi とandroidアプリを通信させた。
RP 側設定
# hciconfig
hci0: Type: BR/EDR Bus: USB
BD Address: 00:1B:DC:04:AE:D7 ACL MTU: 310:10 SCO MTU: 64:8
DOWN
RX bytes:1842 acl:9 sco:0 events:97 errors:0
TX bytes:2048 acl:9 sco:0 commands:75 errors:0
# hciconfig hci0 up
# hciconfig hci0 piscan
# hciconfig
hci0: Type: BR/EDR Bus: USB
BD Address: 00:1B:DC:04:AE:D7 ACL MTU: 310:10 SCO MTU: 64:8
UP RUNNING PSCAN ISCAN ←★変わることを確認
RX bytes:11852 acl:222 sco:0 events:579 errors:0
TX bytes:11710 acl:260 sco:0 commands:175 errors:0
# /etc/init.d/Bluetooth stop
# /usr/lib/bluetooth/bluetoothd -C &
# sdptool add –channel=22 SP ★BT上、シリアル通信を22番で行う宣言
# sdptool browse local 登録されたかを確認
<略>
Service Name: Serial Port
Service Description: COM Port
Service Provider: BlueZ
Service RecHandle: 0x10005
Service Class ID List:
“Serial Port” (0x1101)
Protocol Descriptor List:
“L2CAP” (0x0100)
“RFCOMM” (0x0003)
Channel: 22
Language Base Attr List:
code_ISO639: 0x656e
encoding: 0x6a
base_offset: 0x100
Profile Descriptor List:
“Serial Port” (0x1101)
Version: 0x0100
方法1)rfcommコマンドを使って 22番ポート待ち受ける
# rfcomm listen /dev/rfcomm0 22
Waiting for connection on channel 22
<アプリから通知があるまで、ここで待つ>
Connection from 44:D4:E0:72:8A:39 to /dev/rfcomm0
Press CTRL-C for hangup
方法2)rfcomm-server.c を改編
オリジナルソース:http://people.csail.mit.edu/albert/bluez-intro/x502.html
実行プログラム作成
#gcc -o rfcomm-serer rfcomm-serer.c -lbluetooth
rfcomm-server.cの内容 ★最初に端末から文字を読み取り、その後端末にhelloと戻す。
#include <stdio.h>
#include <unistd.h>
#include <sys/socket.h>
#include <bluetooth/bluetooth.h>
#include <bluetooth/rfcomm.h>
int main(int argc, char **argv)
{
//struct sockaddr_rc loc_addr = {00:1B:DC:04:AE:D7}, rem_addr = {44:d4:e0:c8:45:11};
struct sockaddr_rc loc_addr = { 0 }, rem_addr = { 0 };
char buf[1024] = { 0 };
int s, client, bytes_read, status;
socklen_t opt = sizeof(rem_addr);
int ch = 1 < argc ? atoi(argv[1]) : 1;
printf(“channel [%d]\n”,ch);
// allocate socket
s = socket(AF_BLUETOOTH, SOCK_STREAM, BTPROTO_RFCOMM);
printf(“socket [%d]\n”,s);
// bind socket to port 22 of the first available
// local bluetooth adapter
loc_addr.rc_family = AF_BLUETOOTH;
loc_addr.rc_bdaddr = *BDADDR_ANY;
loc_addr.rc_channel = (uint8_t) ch;
bind(s, (struct sockaddr *)&loc_addr, sizeof(loc_addr));
// put socket into listening mode
listen(s, 1);
// accept one connection
client = accept(s, (struct sockaddr *)&rem_addr, &opt);
ba2str( &rem_addr.rc_bdaddr, buf );
fprintf(stderr, “accepted connection from %s\n”, buf);
memset(buf, 0, sizeof(buf));
// read data from the client
bytes_read = read(client, buf, sizeof(buf));
if( bytes_read > 0 ) {
printf(“received [%s]\n”, buf);
}
if( status == 0 ) {
status = write(client, “Hello”, 5);
}
if( status < 0 ) perror(“uh oh”);
// close connection
close(client);
close(s);
return 0;
}
# rfcomm-server 22 (22番ポートで起動する)
Android アプリの設定
アプリは、クライアントとして動作させる。
Android studio 起動して File->import sample -> Connectivity:BluetoothChat をロード
コンパイルして androidアプリとして起動する。
Select a device connect にて raspberry pi(00:1B:DC:04:AE:D7)をタッチする。
(RP にて、rfcomm-server 22 が起動してないと not connected として終了)
起動していれば、connected to raspberry pi となる。
アプリ側から、適当な文字を入力して send ボタンを押す。
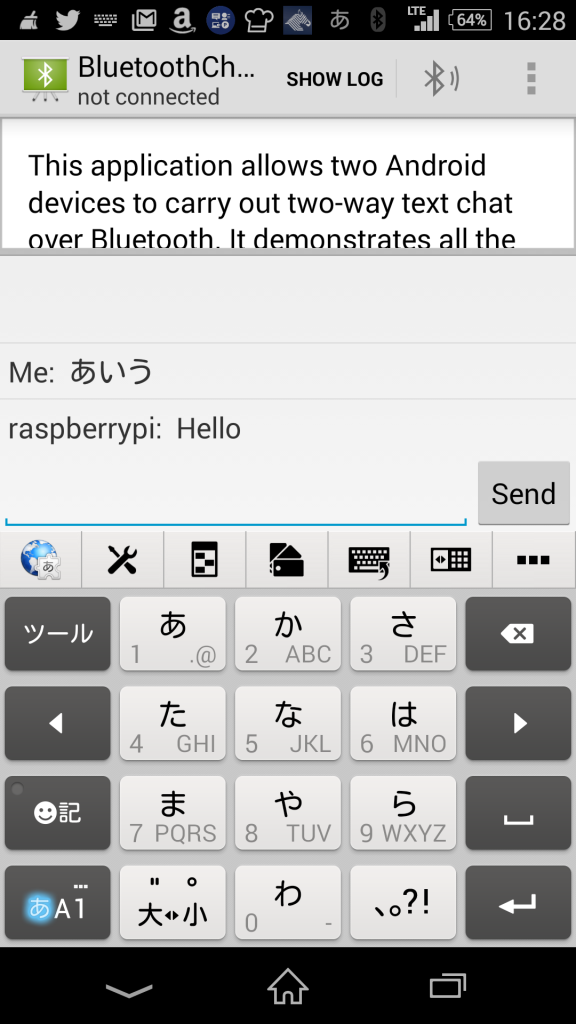
「あいう」と送ると、RPに表示されて、そのあと端末画面に「Hello」と表示。


